“Let’s check”, says the doss visual solution payoff
And it is precisely visual inspection, with a high level of automation and innovation, the specialisation of the Brescia-based company, which has both its production site and showroom in Erbusco. A company active since 1995 and truly global in scope, with interests not only in Italy and Europe, but also in North America and the Far East.
Machines for quality control and visual inspection, therefore, with an important focus on the control of key components in manufacturing such as the O-rings. And a well-equipped and skilled engineering department, able to customize each time the machines according to the customer’s request. Because, although in many cases they have a shared core, especially as for handling parts, these machines are truly tailor-made, called upon to combine extreme control accuracy with maximum productivity.
AN INNOVATIVE AND TECHNOLOGICALLY ENGAGING SYSTEM
What is most striking about entering the Doss Visual Solution workshop is the number of machines being built. We would fill in a complete issue of our magazine if we talked about all the machines we have seen. But we can’t, so we focus on an innovative and technologically engaging system. We rely on Fabio Cadenelli, Head of Automation and Electrical Department, to find out more. “The customer who commissioned us with this machine, to be delivered in Japan, has to measure O-rings with a diameter of at least 80 mm, and cross-sections of 2.5 mm, up to 200 mm diameter with a cross-section of 6. We decided to install four linear cameras, each of them scanning a section of the O-ring at very high resolution. This is the heart of the machine. But we’ll get there. Let’s rather introduce the system. The geometrically complex structure was designed to minimize vibrations, which could negatively affect performance as well as the footprint, reduced by almost half compared to the previous versions.
CYCLE TIME LOWER THAN 11 SECONDS
The work cycle, which has a time of 11 seconds for the largest O-rings in terms of size, begins with a six-axis Denso robot in charge of bin-picking the pieces from a container placed on a pull-out trolley. “In agreement with the customer, we chose the Denso robots because we consider them to be particularly suited to the needs of the vision”, says Mr Cadenelli. “The first robot is a six-axis one because, since we had to pick up pieces randomly from the container, we wanted a robot that could reach any corner: the system is, in fact, able to map the bottom of the container as well, avoiding possible collisions. The bin picking system uses a 3D scanner that, thanks to a structured laser light, generates various types of patterns on the surface of the pieces and gives life to a cloud of points useful for establishing the gripping coordinates”.
Speaking of gripping, the gripper mounted on the robot, developed in collaboration with Euclid, integrates a vacuum system – which initially picks up the piece individually and lifts it slightly – and a mechanical gripper that brings the O-ring on a table used as a buffer to reduce cycle time. The system also relies on a second camera that checks that the gripper has only picked one O-ring.
AT THE HEART OF THE MACHINE: THE SCARA INTERACTS WITH THE VISION SYSTEM
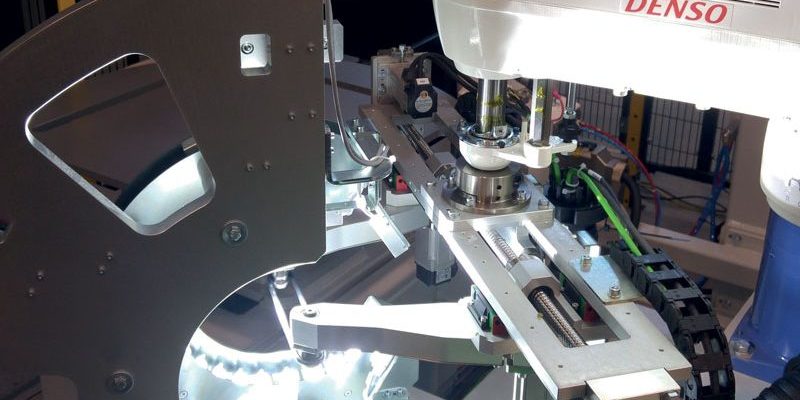
The second phase of the cycle, crucial for inspection, starts with the O-ring on the rotary table. Here, the Denso SCARA robot comes into action. We ask Fabio Cadenelli why did they choose this type of robot. “At this stage of the process, the picking, control and storage positions are known. A six-axis robot would therefore have been wasted. Furthermore, the SCARA allows us to mount a gripper with a complex structure and, above all, capable of managing heavy weights by moving the workpiece at high speed. The gripper, which picks up the O-ring and keeps it in tension for inspection – Mr Cadenelli specifies – has a special design with a self-centering system in order to adapt to the different cross-sections of the O-rings, from 2 to 8 mm, without having to add any tools. The goal is that the workpiece is stable enough during rotation.
The heart of the machine is the control station, which can count on a lighting system specifically designed for this application. “In vision, light is the essential element”, says the Head of Automation and Electrical Department at Doss. “Having a camera with the best possible resolution may be a waste if the light distribution is not homogeneous, as the result will not be optimal. The four hi-res Teledyne Dalsa linear cameras, in combination with the SCARA robot that slightly rotates the piece, scan the full image of the O-ring”.
The backlight system with the latest generation LED lights, equipped with a totally custom geometry, is therefore essential to ensure maximum accuracy of inspection. The cameras’ handling device is completely automatic: an important feature because, when the geometry of the piece changes, the electronic axes can be automatically adjusted, so as to always have the best focus on the piece.
“As an additional precaution, the LEDs are angled so that the light does not illuminate the O-ring perpendicularly, thus creating a sort of shadow effect that allows users to identify even the most complex defects to be detected. Our main goal is to cover all the areas of the O-ring that need to be checked”.
THE OTHER FEATURES OF THE MACHINE AND THE HMI SOFTWARE
What are the main elements to be considered when checking the O-rings? “Because of its very structure, rubber is subject to elastic effects. The backlighting system we have designed, in addition to allowing us to accurately detect the thickness of each section of the O-ring in six different positions, also enables us to identify any defects generated during the closing stage of the mold. A crucial stage indeed, because right there some sealing issues might happen”, explains Mr Cadenelli.
Other important features of the machine are the brushless technology for the motion part, the integration between standard and safe PLCs, the latest generation safety barriers with safety locks to prevent accidental access, as well as the presence of sensors to detect any faulty O-ring on the conveyor belt of the controlled O-rings”.
The software, developed internally by Doss Visual Solutions, allows users to define the windows to be adapted to the features of the piece and contains custom algorithms, able to provide actual measurements of the defect and to define the thresholds of classification. According to the customer’s indications, it is also possible to set the quantity of pieces to be checked and, thanks to the information on average productivity, to make a forecast of the time needed to check a defined quantity of O-rings, the latter useful for planning and production management purposes.
Ispezione accurata degli O-ring senza rinunciare al tempo ciclo


